The WP SMS plugin works seamlessly with the Twilio Gateway, allowing you to send SMS messages to any location worldwide!
How to configure the Twilio gateway?
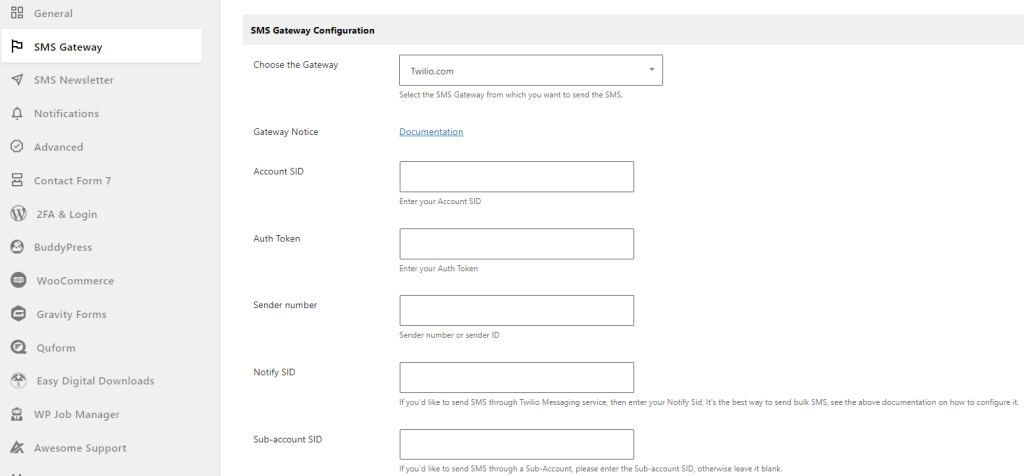
To access Twilio’s services, you must provide your Account SID and Auth Token as authentication. You can find these credentials in your Twilio account console.
Follow the below steps and fill out the fields:
- Go to your gateway Twilio Console
- Copy your Account SID and Auth Token
- Go to the WP SMS Plugin in the WordPress dashboard
- Navigate to the Settings tab
- Select SMS Gateway
- Paste those credentials to Account SID and Auth Token
- Click Save Changes
- Verify that the Gateway Status is now Activated
How to configure the Twilio gateway for bulk SMS?
1. Purchase a phone number
To deliver the message, you need a Twilio phone number. If you haven’t already, log into your Twilio console and go to Phone Numbers → Manage → Buy a number.
2. Attach the phone number to Messaging Service
After purchasing the phone number, it needs to be linked to a Messaging Service. These services are used to group together senders (phone numbers) with a set of predefined features and responses.
They are ideal if you have a single endpoint that needs to provide the same response but in different regions. With a Messaging Service, a single API response can reach all of your subscribers in different countries, with different numbers.
In the console, go to Messaging → Services. If you don’t have an existing Messaging Service, create one by clicking on the blue Create Messaging Service button.
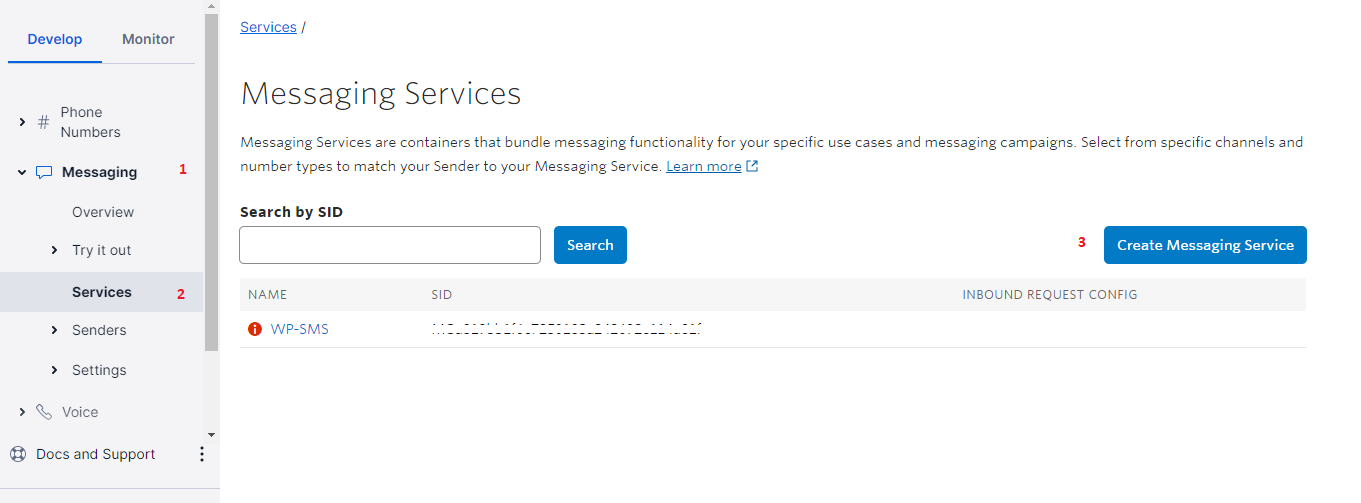
When the form appears, enter “Send Bulk SMS” as the Messaging Service Name. Once you have filled it out, click on the blue Create button.

After creating the service, you will be directed to the Sender Pool. This feature enables you to add your phone number as a sender. To do so, click on the Add Senders button and follow the instructions.
Troubleshooting
Here are some solutions to resolve issues you faced with Twilio & WP SMS:
1. Account Verification: Ensure that you are not using a trial Twilio account. Full account access is required for SMS functionality.
2. Verified Numbers: Confirm that the intended number is listed among your verified numbers in the Twilio console. If it’s not, please verify it from that page first.
3. Geo-Permissions: To send SMS to a specific region, visit your account’s Geo-Permissions settings and ensure that you have enabled the necessary permissions.
4. Mobile Country Code: While testing, try sending SMS both with and without the mobile country code. You can also leave the country code empty in the Settings → General section.
5. Correct Destination Numbers: Double-check that the destination numbers you’re sending SMS to are accurate and properly formatted.
6. Sender ID and Account Balance: Verify that the sender ID is accurate and corresponds to your intended identification. Additionally, ensure that your account has sufficient credit to send SMS.
If you are still having problems sending SMS, contact us.